
Everybody loves gaming, whether physical or on computers. PC gaming is one of the wealthiest industries and hugely popular among kids and young adults. When it comes to gaming, Windows 10 is one of the most optimized Operating System for it. It not only enables you to play modern high-end games but if you are a fan of retro games, you can play that too on Windows 10. Further being a Microsoft product, Windows 10 also provides a way for Xbox One streaming.
All in all, there is a lot for both online and offline gaming in Windows 10. However, because of many other processes running on the system, your Windows 10 PC can slow down and can badly affect your gaming experience. And nobody likes to encounter lag while playing games.
Thankfully Windows 10 comes with many optimizing settings to make your task easier.
In this guide, we would walk through some easy ways to optimize Windows 10 system for gaming.
Enable the Windows 10 Game Mode
Windows 10 comes with an in-built Game Mode that can optimize your system specifically for gaming. To enable it on your device, follow these steps.
-
On the windows search box, search for Settings, and open it.

-
Select Gaming settings

-
From the left pane, choose Game Mode.

-
Toggle the button to switch ON the Game Mode

Get PC Optimization Software
With times every computer system, especially the one running on Windows OS, tends to slow down. It is because so many unnecessary files such as Temporary files, uninstalled program residue, unuseful registry entries, and many others get accumulated in the system, thereby making it sluggish. For carrying out the maximum performance from your PC, many third-party PC optimization tools are available in the software market.
These optimization programs clear the junks from your PC and boost it up for the best performance. It is therefore recommended to get a robust PC optimization tool to enhance your gaming performance.
Optimize Online Gaming with Faster DNS
While playing online multiplayer games, users often have to deal with the lag because of slow internet connection. You can slightly optimize this by changing the DNS settings of your PC.
- Open Windows Settings from the windows search box
- Select Network and Internet settings

- On the next window, choose Change Adapter Options.

- Right-click on your internet network and choose Properties

- Double-click on Internet Protocol version 4.

- Replace the current DNS entries with 1.1.1.1 and 1.0.0.1, respectively.

- Click on OK and close the settings. Restart the network.
Your internet speed would enhance a bit. However, don’t expect a much difference as the speed depends on the internet plan you have subscribed to.
Disable Automatic Updates and Change Active Hours while Gaming
You might have often experienced that your PC has suddenly restarted because Windows needs to install the latest updates that it has downloaded. Although Windows usually asks the user before restarting, some updates need to be installed immediately.
It is better to disable the Automatic Updates while gaming. Here is how you can do that.
- Open Windows Settings.
- Select Update & Security

- Click on Pause updates for 7 days. You can click on it for five times to disable updates for 35 days.

- Under it, there is the option to Change active hours.

- Click on it, and set your active hours so that Windows does not apply updates during that period.

- Under Windows Update, there is another option – Advanced options. Click on it for applying more settings.

- Switch OFF the option to Restart the system as soon as updates are ready to install.

Use Ultimate Performance Power Plan
By changing the power plan to the Ultimate Performance, you can highly optimize not only gaming but also other heavy tasks on your system.
However, the disadvantage is, if your device is running on battery, its life would be shortened. Still, if you want to enable the Ultimate Performance, here is how you can do that.
- On the windows search box, search for Control Panel, and open it.

- Choose the System and Security
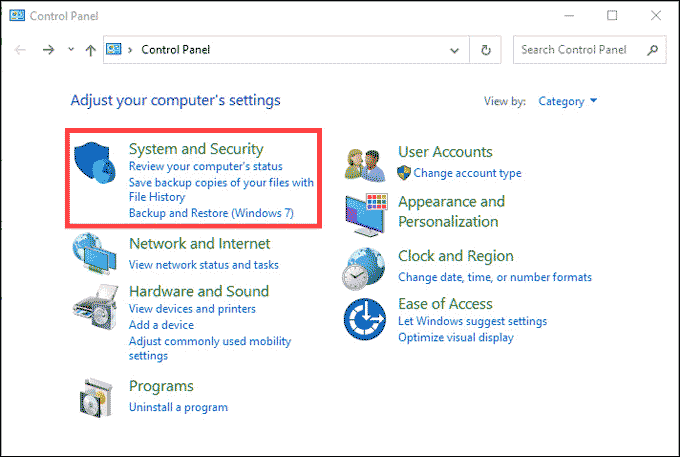
- On the next window, from the right pane, choose Power Options.

- Under additional options, enable the Ultimate Performance bullet option.

Update Graphic Card Drivers
Updating the graphic card drivers to the latest version can optimize your gameplay. Always ensure that not only the graphic card drivers but all other drivers should also be updated regularly. If you find it tedious to check for and update the drivers manually, you can get the third-party advanced drivers updater software.
Here is how you can manually update the Graphics Card drivers:
- Right-click on the Windows icon and select the Device Manager.

- Expand Display adapters, right-click on the graphic card driver, and choose Update.

- Follow the on-screen instructions to update it.
Adjust Windows Visual Effects for Best Performance
You can adjust your Windows visual effects to the best performance for the clinical graphic experience.
Here is how to enable it.
- On the windows search box, search for View advanced system settings and click on its icon to open it.

- Under the Performance heading, click on Settings.

- On the next window, under the Visual Effects tab, click on Adjust for best performance bullet option.

- Click Apply and then OK.
Bottom Line
This post has guided you on tweaks to enhance your gaming experience on Windows 10 devices. Most of these tricks would also speed up your PC in general. However, it is recommended for the best experience to upgrade the system’s hardware components such as RAM or graphic card.
As compared to the earlier versions of Windows and other OS, Windows 10 provides many more options for the best gaming experience. Follow this guide to know how to optimize Windows 10 settings for gaming.
There could be multiple reasons for the slowing down of the computer. Like the old processor, outdated drivers, unnecessary junk, low RAM, an unused collection of Apps, malware attack, and more.


